Contents
- Git basics you need to know
- VS Code basics you need to know
- Save is not the same as commit
- Basic local workflow – Hands-on
- Install Git
- Configure Git (first-time setup)
- Create a GitHub account, a repository and the initial branches
- Clone the repository
- Get the latest main
- Create a new feature branch from main
- Make local changes
- Stage and commit
- Push to GitHub
- See it with your own eyes — branch switching demo
- Promotion to staging
- Promotion to main
- Return to your feature branch if you continue working
- Clean up: delete the branch and prune stale references
- Most common beginner mistakes
- What to read next
- Task on the komiti_academy project for the candidate
 1) Git basics you need to know
Git is a distributed version control system — a software tool for your laptop invented by Linus Torvalds in 2005 (https://git-scm.com/) that tracks every change to every file in a folder, keeps a complete history, and lets multiple people work on the same codebase without overwriting each other's work.
The problem that Git solves is this: without it, you end up with folders named project_v2_final, project_v2_final_REAL, project_v2_FIXED_by_marko — and nobody knows which version is current, what changed between them, or how to combine two people's work. Git replaces all of that with a single folder that remembers every version internally.
Git manages to track versions of files by organizing them into:
- Git repo — imagine that is a cabinet,
- branch — imagine that is a separate binder inside that cabinet, and
- file — imagine that are sheets of paper inside that binder.
Basic Git rule is that you can only have one binder (branch) open (checkout) on your desk at a time; when you are done, you can copy (merge) files from one binder (branch) into another. Git keeps every version of every file, compressed, inside a hidden .git/ folder — so nothing is ever lost.
1.1) Local and remote ( GitHub) branch
GitHub is a platform where the remote repo lives. It was launched in 2008 by Chris Wanstrath, P. J. Hyett, Tom Preston-Werner and Scott Chacon, and acquired by Microsoft in 2018. Git and GitHub are not the same: Git is a version control system, whereas GitHub is a platform.
Remember we imagined Git as a cabinet (repo) with binders (branches)? Now let's look at that diagram through the same analogy, using the KomITi workflow as a concrete example.
The feature → staging → main promotion pattern is a widely adopted branching strategy. It originates from Vincent Driessen's Git Flow model (2010) and is documented in the official Git Book — Branching Workflows. KomITi follows this pattern as defined in ENGINEERING_HANDBOOK.md.
According to best practices and ENGINEERING_HANDBOOK.md of KomITi, your local cabinet (repo; e.g. C:\dev\KomITi\komiti_library) and remote cabinet (repo; e.g. https://github.com/your_name/komiti_library) should each contain three binders (branches):
main— the clean, published binder (branch). Whatever files are in here is what the world sees.staging— the review binder (branch). Before any files go intomain, they are first copied here so someone can check them.feature(e.g.2026-03-21-features) — your personal working binder (branch). This is where you actually write on files.
git checkout is you pulling one binder (branch) out of the cabinet (repo) and putting the others back, as you can only have one binder (branch) open on your desk (working tree) at a time. Your desk (working tree) always shows the files of whichever binder (branch) you currently have open.
GitHub (the remote called origin) is a second cabinet (repo) on the remote side of the room. It keeps its own copies (called REMOTE or origin/) of the same three binders (branches): origin/main, origin/staging, origin/feature. The same branch can exist in two places: locally, on your computer and remote, on GitHub. The diagram above shows exactly this: the bottom row is your desk (LOCAL), the top row is the remote cabinet (REMOTE).
The arrows in the diagram map to real actions (Workflow):
git checkout -b yyyy-MM-dd-feature(arrow at the bottom going left ←) = You, developer, starts by taking a fresh empty binder (branch), copy the current files frommaininto it, and label itfeature.
In practice:git checkout main→git pull origin main→git checkout -b 2026-03-23-play_xyz.git add+git commit(working inside the binder (branch)) = you change files in VS Code, check what you did withgit status --shortandgit diff --stat, then save a snapshot withgit add <file>andgit commit -m "your message".git push(arrow going up ↑) = you walk to the remote cabinet (repo) and replace its copy of a binder (branch) with your updated version.
In practice:git push -u origin 2026-03-23-play_xyz— your local branch now also has a remote copyorigin/2026-03-23-play_xyz.git merge(arrow going right →) = you copy the files you wrote in one binder (branch) into another binder (branch), on your desk.
In practice:git checkout staging→git pull origin staging→git merge 2026-03-23-play_xyz→git push origin staging. Then repeat formain.git pull(not shown, but the reverse of push) = you walk to the remote cabinet (repo), take the latest copy, and update the binder (branch) on your desk.
So the full KomITi flow in the cabinet analogy is:
1.2) Does Git create a separate folder on disk for each branch?
NO. You have one single folder (e.g. C:\dev\KomITi\komiti_library), and Git changes the contents of that same folder when you switch from branch to branch. When you run git checkout main, Git replaces the files in that folder with the state of the main branch from the local .git/ database. When you run git checkout 2026-03-23-play_xyz, Git replaces the files in the same folder with the state of that feature branch. Therefore:
- you have one single folder for all branches in your repo,
- Git does not download anything from GitHub into this folder when you change (
checkout) branches — it only overwrites files on disk from the local.git/database where Git stores all states of all branches, compressed (files that differ Git overwrites, files that exist only on the old branch Git deletes, and files that exist only on the new branch Git creates).
git worktree mechanism (KomITi Worktree-per-Branch convention) to expose each active feature branch as its own physical folder. The basic statement above (one folder = one currently checked-out branch) still holds inside each of those folders. The convention is introduced in section 4.6.4.Concrete example: imagine a repo with three branches — main, staging and 2026-03-23-play_xyz — each containing different files. Both Windows Explorer and VS Code Explorer always show only the currently checked-out branch:
git checkout main

PS C:\dev\KomITi\komiti_library> ls
  x.md
git checkout staging

PS C:\dev\KomITi\komiti_library> ls
  x.md
  y.md
git checkout 2026-03-23-play_xyz

PS C:\dev\KomITi\komiti_library> ls
  x.md
  y.md
  z.md
You never see files from all three branches at once. When you run git checkout staging, Git:
- reads the state of branch
stagingfrom the.git/objects/database, - physically overwrites files on disk to match that state:
- 2.1. physically deletes from disk files that
stagingdoes not have, - 2.2. physically creates on disk files that
staginghas but the previous branch did not.
- 2.1. physically deletes from disk files that
When you switch back to main, Git deletes y.md because main only has x.md. The original files are not lost — they are stored compressed in .git/objects/. You can verify this outside VS Code: open Windows File Explorer, switch branches in the terminal, and you will see files physically appear and disappear.
1.3) Let's deep dive into .git/
What is the .git/ database actually? It is not an SQL database nor plain text — it is a folder-based object store, i.e. a structure of folders and compressed files that Git maintains in the hidden .git/ folder inside your repo. The structure looks roughly like this:
.git/
├── objects/      ← all snapshots (commits, files, trees) — compressed
├── refs/         ← "pointers" (branches, tags) — text files
├── HEAD          ← text file that says which branch you are on
├── config        ← repo settings (remote URL etc.)
├── index         ← staging area
└── ...
objects/= every file, every commit and every folder structure you ever committed exists here as a compressed blob object; Git addresses them via SHA-1 hashes (that long string of letters and numbers),refs/= branches and tags; e.g. the filerefs/heads/maincontains only one line — the hash of the commit thatmaincurrently points to,HEAD= a text file that says which branch you are on; open it and you will see something likeref: refs/heads/main,index= the staging area; this is where Git remembers what you staged for the next commit.
When you run git clone, Git creates this folder and downloads every object from the remote into it — every commit, every version of every file, every branch. (If you start a brand-new repo with git init, the folder is created empty.) From that point on, every git checkout reads only from this local .git/ folder — no download from GitHub.
Practical consequence: when you run git checkout main, Git looks at refs/heads/main, finds the hash of the last commit, extracts the compressed versions of files from objects/ and overwrites them in your working folder. That is why checkout does not download anything from GitHub — everything is already there, on your disk, in the .git/ folder.
git show <branch>:<path> lets you see the contents of a file from another branch without changing your working folder. For example, git show main:README.md extracts that version of the file from .git/objects/ and displays it in the terminal, without overwriting anything on disk.
1.4) clone vs fork
clone and fork are not the same: clone is a local copy of a repo on your computer, and fork is your personal remote copy of someone else's repo on GitHub.
fork is most commonly used when you don't have write access to the original repo, so you make changes in your own GitHub fork and then send a Pull Request to the original repo.
Practically: if you work in your own or team-accessible repo, you usually need clone; if you work on someone else's GitHub repo without direct write access, then you first need fork, and only then clone that fork.
1.5) DevOps vs CI/CD
DevOps is a broader way of working and collaborating between the development and operations sides, with the goal of delivering and maintaining software faster, more securely and more stably. CI/CD is a narrower, practical part of that: a set of automated pipelines and steps that build, test and deliver code.
Both emerged as a response to a slow, manual and separated way of building, testing and releasing software, where development and operations long worked as separate worlds — they did not originate from a single author but gradually evolved in the software industry through agile, automation and DevOps practices.
The difference: DevOps is a culture, operating model and work discipline; CI/CD is the concrete mechanism and tooling flow that implements that discipline. Practically: DevOps tells you how a team should work and what it wants to achieve, while CI/CD serves to automatically verify and move those changes from commit to deployment.
1.6) .gitignore — telling Git what to ignore
.gitignore is a plain text file in the root of your repository that tells Git which files and folders to completely ignore — never track them, never show them in git status, and never allow them to be committed.
Why do you need it? Not everything belongs in a repository. Typical things you want to keep out:
- Build output —
__pycache__/,*.pyc,node_modules/ - IDE / editor config —
.vscode/,.idea/ - OS junk —
Thumbs.db,.DS_Store - Credentials and secrets —
.env,*.key,*.pem - Large binary files and dumps —
*.dump,*.pgdump
A small example file:
# .gitignore
passs.txt
.env
__pycache__/
*.pgdump
How it works — one pattern per line:
| Pattern | What it ignores |
|---|---|
*.pyc | Every file ending in .pyc, in any folder. |
__pycache__/ | The entire __pycache__/ folder and everything inside it. |
pass.txt | The file named pass.txt anywhere in the repository. |
/build/ | The build/ folder only in the repository root (leading / = root-relative). |
!important.log | Negation — do not ignore this file, even if another rule covers *.log. |
# comment | Lines starting with # are comments and have no effect. |
.gitignore file itself is tracked and should be committed so the whole team shares the same ignore rules. git rm --cached <file> stops tracking a file that was already committed; only after that will .gitignore keep it out of future commits.
1.7) Git commands that you must know
| Command | What it does |
|---|---|
git add <file> | Stages a file so it will be included in the next commit. |
git branch | Lists all local branches. The current branch is marked with * and shown in a different colour, so you always know which branch you are on. |
git checkout <branch> | Switches your working tree to another branch. |
git checkout -b <name> | Creates a new branch and switches to it in one step. |
git clone <url> | Downloads a remote repository to your machine and creates a local copy. |
git commit -m "msg" | Saves all staged changes as a new snapshot in the local repo history. |
git diff | Shows line-by-line changes between your working tree and the last commit. |
git log --oneline | Shows a compact list of recent commits (hash + message). |
git merge <branch> | Merges another branch into the one you are currently on. |
git pull | Downloads new commits from the remote and merges them into your current branch. |
git push | Uploads your local commits to the remote repository (GitHub). |
git rm --cached <file> | Stops tracking a file (removes it from the index) but keeps it on disk. Use this when a file was committed by mistake and you now want .gitignore to cover it. |
git stash | Temporarily shelves uncommitted changes so you can switch branches cleanly. |
git stash pop | Restores the most recently stashed changes back into your working tree. |
git status | Shows which files are modified, staged or untracked in your working tree. |
 2) VS Code basics you need to know
Visual Studio Code (VS Code) is a free, open-source code editor released by Microsoft in 2015. It is built on the Electron framework and runs on Windows, macOS and Linux. It is the editor we use at KomITi for all development work. Install it now on your computer from https://code.visualstudio.com.
2.1) Explorer
Explorer is the left panel in VS Code where you see folders and files. Some tips on Explorer:
- In Explorer you preview a file with a single click (its name will be in italics), and you open a file with a double click.
- In Explorer you see files and folders of the active workspace; if the workspace is multi-root, you see multiple top-level root folders in the same panel.
- Explorer also shows the Git status of each file with a coloured letter next to the file name:
- M — Modified: the file has been changed locally. Typically disappears after a commit or if you revert the file to its original state.
- U — Untracked: a new file not yet added to Git; in a merge conflict it can also mean unresolved/unmerged state. Typically disappears when you add the file with
git addand commit, or if you delete that new file. - A — Added: a new file that has been staged. Typically disappears after the commit that includes it.
- D — Deleted: the file has been deleted in the local workspace. Typically disappears when the deletion enters a commit, or if you restore the deleted file.
- R — Renamed: the file has been renamed. Typically disappears after the rename is committed.
2.2) Workspace
Workspace is the VS Code context you work in. It can contain one folder or multiple folders.
- If you do
Open Folderin VS Code, you will open one folder as your working workspace and automatically one unnamed Workspace. - If you do
Add Folder to Workspacein an already open workspace, you get amulti-root workspace, i.e. a workspace with multiple top-level root folders. workspaceis not just a visual concept in VS Code, but a context boundary for search, file reading, terminal and agent work.- Can you have multiple workspaces at the same time? Yes, you can, but not in a single VS Code window.
- Practical rule: if you want clear context separation, fewer mistakes and less confusion about commands, it is often safer to have two windows than one cluttered multi-root workspace.
In a multi-root workspace each root folder has its own .git/ folder and its own branch — they are completely independent repositories that just happen to be open in the same VS Code window. VS Code tracks them separately in the Source Control panel and the Status Bar switches context depending on which file is active.
2.3) Source Control
Source Control is the VS Code panel that shows you the Git state of your repo. You open it from the Activity Bar on the left side or with Ctrl+Shift+G.
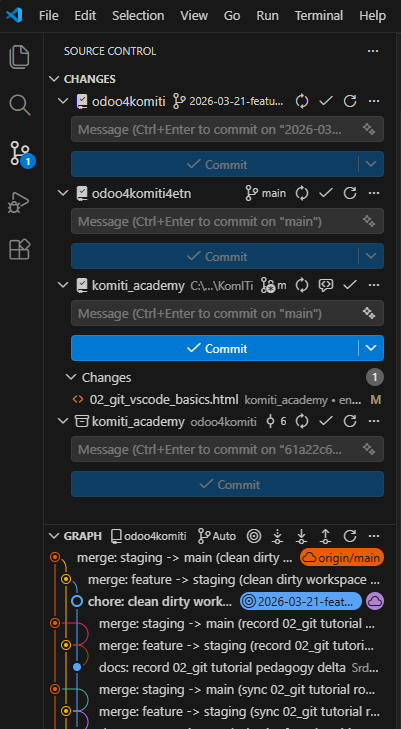
- It shows which files are staged (ready for the next commit), which are unstaged (modified but not yet added) and which are untracked (new files Git has never seen).
- You can stage a file by clicking the + next to it, type a commit message in the text box at the top, and click ✓ Commit.
- Explorer gives a quick visual signal next to the file name; the Source Control panel shows more detail — what is staged, what is unstaged and what goes into the next commit.
- When in doubt, Source Control panel and
git status --shortare more reliable than guessing by icons.
2.4) Terminal
Terminal is the built-in command line inside VS Code. You open it with Ctrl+` (backtick) or from the menu Terminal → New Terminal.
- The terminal opens in the root of your current workspace folder, so
gitcommands run against the correct repo automatically. - You can have multiple terminal tabs open at the same time — useful when you need one for
gitand another fordocker compose. - On Windows the default shell is PowerShell; on macOS/Linux it is typically Bash or Zsh.
- Everything you can do in an external terminal you can do here — the advantage is that it lives inside VS Code, next to your files and Source Control panel.
2.5) VS Code Status Bar
The Status Bar is the thin horizontal strip at the very bottom of the VS Code window. At a glance you can see:
- Git status indicator (left) — current branch, sync status, errors/warnings.
- Editor context (right) — cursor line and column, file encoding (UTF-8), language mode (HTML, Python…), indentation (Spaces/Tabs).
- Something looks wrong — wrong branch, wrong language highlighting? Glance at the Status Bar first.
Git status indicator
In the Git status indicator you often see a short Git status for the active repo.

Using an example like:
odoo4komiti= the repo you are currently working in,2026-03-11-features= the branch you are currently on,*= you have local changes that are not yet committed,- the circular arrows icon = Git sync/refresh zone; here VS Code shows or offers fetch/pull/push/sync, and if the icon is spinning, a Git operation is usually in progress.
The indicator shows the Git context of the active repo in the current workspace — it is not some special "Copilot workspace" or separate agent context.
You, the agent, and every tool in that workspace share one working tree and one checked-out branch. There is one .git/HEAD file per clone — when anyone (you, agent A, agent B) runs git checkout other-branch, HEAD changes on disk, files are physically overwritten, and everyone in that workspace immediately sees the new branch. There is no mechanism for two agents to be on different branches in the same clone.
- If the indicator shows
2026-03-11-features, you and the agent are both on2026-03-11-featuresright now. The agent can rungit checkoutand switch — the indicator updates accordingly. - If the indicator does not match what you expect, run
git statusandgit branch --show-current— you might be looking at a different repo in a multi-root workspace. - In a multi-root workspace, VS Code shows Git context for the active file's repo, so pay attention to which file is active and in which root you are working.
2.6) Connecting VS Code to GitHub
Before you can push code or use GitHub-powered features (e.g. GitHub Copilot), VS Code needs to know who you are on GitHub. There are two separate authentication layers — understand both:
Layer 1 — VS Code account sign-in
This connects the VS Code application to your GitHub identity and unlocks extensions that depend on it (GitHub Copilot, GitHub Pull Requests, Settings Sync).
- In VS Code, look at the bottom-left corner of the Activity Bar — click the Accounts icon (person silhouette).
- Click Sign in with GitHub to use GitHub Copilot (or Turn on Settings Sync… — either option triggers the same GitHub sign-in).
- Your browser opens a GitHub authorization page — click Authorize Visual-Studio-Code.
- The browser asks to open VS Code — allow it. VS Code now shows your GitHub username next to the Accounts icon.
You do this once. VS Code remembers the session across restarts.
Layer 2 — Git CLI authentication (push / pull)
When you run git push or git pull for the first time on a new machine, Git itself needs credentials to talk to GitHub over HTTPS. On modern Windows, Git Credential Manager (GCM) handles this automatically. GCM is an open-source helper maintained by GitHub (originally developed by Microsoft starting in 2015) and ships with Git for Windows by default:
- You run
git pushin the terminal. - GCM opens a browser window asking you to sign in to GitHub (or shows a device-code prompt).
- After you authorize, GCM stores the token securely in Windows Credential Manager — future push/pull commands work without prompts.
Note: if you installed Git for Windows version 2.39 or later, Git Credential Manager is included automatically — you do not need to install anything extra. You can verify with git credential-manager --version.
Quick check — am I connected?
- VS Code account: click the Accounts icon — you should see your GitHub username listed.
- Git CLI: run
git credential-manager github listto list any stored GitHub accounts (works on GCM 2.6+). On older versions or if the command is not recognised, open Windows Credential Manager → Windows Credentials and look for entries starting withgit:https://github.com.
3) Save is not the same as commit
This is a key beginner distinction:
savewrites the file to disk,commitrecords that change in Git history,pushsends that commit to GitHub.
So the order is often:
- edit the file,
save,- review the diff,
git add,git commit,git push.
4) Basic local workflow – Hands-on
In this section you will create your own GitHub repository, clone it to your machine and walk through the full KomITi feature → staging → main workflow with real commands. The repository you create here — komiti_library — is the same one you will use later in Odoo from 0 to Hero to build the library Odoo module.
Before you can follow the steps below, you need Git installed and a working connection to GitHub. The next sections walk you through that setup.
4.1) Install Git
- Go to https://git-scm.com/downloads and download the installer for your operating system (Windows, macOS, or Linux).
- Run the installer. On Windows, the default options are fine — just click Next through each screen.
- After installation, open a terminal in VS Code (View → Terminal) and verify:
PS C:\Users\you> git --versionExpected output is similar to git version 2.47.1.windows.2. If the command prints a version number, Git is installed correctly.
What you should notice:
- Windows Explorer: No change — you have not created or cloned a repository yet, so there is no project folder to look at.
- VS Code Explorer: No change — Git installation does not add or remove any files. The Explorer panel shows whatever folder you had open before.
- VS Code Source Control: Once Git is installed, VS Code detects it automatically. The Source Control icon (the branch/fork icon in the left Activity Bar) becomes active. If Git were missing, VS Code would show a warning there instead.
- Git status indicator: No indicators are visible yet — you need to open a Git repository first. The status bar at the bottom of VS Code does not show any branch name or sync status at this point.
- Create the working folder where all your development projects will live:
PS C:\Users\you> mkdir C:\dev
PS C:\Users\you> cd C:\devC:\dev.
4.2) Configure Git (first-time setup)
Git needs to know who you are so it can label every commit with your name and e-mail. Run these two commands once — they are saved globally and apply to every repository on your machine:
PS C:\dev> git config --global user.name "Your Name"
PS C:\dev> git config --global user.email "your.email@example.com"
To confirm the settings:
PS C:\dev> git config --global --listYou should see user.name and user.email in the output.
These two values are used for commit authorship. They are not necessarily the same as your GitHub username.
4.3) Create a GitHub account, a repository and the initial branches
GitHub is the remote service where your repositories will be hosted.
- If you don't have an account yet, go to https://github.com/signup and follow the steps.
- Once logged in, click the + button in the top-right corner → New repository.
- Fill in:
- Repository name:
komiti_library - Description: Odoo library module — KomITi Academy hands-on project
- Visibility: Public (or Private — your choice)
- Initialize this repository with: check Add a README file
- Repository name:
- Click Create repository. GitHub creates the repo with a
mainbranch containingREADME.md.
Seed main with a test file
While still on GitHub (web), add a small test file so you have something to see later when switching branches:
- On the repo page, click Add file → Create new file.
- Name it
x.mdand type:This file exists on every branch. - Click Commit changes (commit directly to
main).
Your main branch now contains README.md and x.md.
What you should notice:
- Windows Explorer: No change — all actions in this step happen on GitHub in your browser. No files are created locally.
- VS Code Explorer: No change — until you clone the repo (next step), nothing local reflects what you did on GitHub.
- VS Code Source Control: Everything in this step happens in the browser on GitHub — nothing changes in VS Code yet.
- Git status indicator: No change — all actions are on the GitHub website. Local VS Code is unaware of the remote repository until you clone it.
Create the staging branch and add y.md
- On the repo page, click the branch dropdown (it says main).
- Type
stagingin the search box and click Create branch: staging from main. Notice thatx.mdis already there — it was inherited frommain. - You are now viewing the
stagingbranch. Click Add file → Create new file. - Name it
y.mdand type:This file exists on staging and feature branches. - Click Commit changes (commit directly to
staging).
Now your branches on GitHub look like this:
main:README.md,x.mdstaging:README.md,x.md,y.md
Pull Request — PR
At the top of the GitHub repository page you may also see a yellow notice that says staging had recent pushes together with a Compare & pull request button. That is GitHub suggesting that you compare the branch you just updated against another branch and optionally open a pull request.

Clicking Compare & pull request would start this workflow:
- Compare (diff). GitHub opens a page showing a side-by-side comparison of exactly which lines were added, changed, or removed on
stagingcompared tomain(GitHub picksmainautomatically because you createdstagingfrom it). - Create a pull request (PR). On that same page there is a form to create a pull request — a formal proposal that says "I want to merge these changes from
stagingintomain." A PR does not merge anything automatically; it opens a conversation where teammates can review the diff, leave comments, and request changes. - Merge. Once reviewers approve, someone clicks Merge pull request and GitHub merges
stagingintomainon the server — no local commands needed.
For now, do not click the button — we will use pull requests later. Just know that the banner is normal and will disappear on its own after a while.
Git itself has no concept of a mandatory PR — that policy is set on the hosting platform (GitHub, GitLab, Azure DevOps…). On GitHub there are two mechanisms:
- Branch protection rules (Settings → Branches → Add rule):
Require a pull request before merging— blocks direct pushes; every change must go through a PR.Require approvals— sets how many teammates must approve before the merge button becomes available (1, 2, 3…).Require review from Code Owners— the person listed as the code owner must approve.
main,release/*). - Repository rulesets (Settings → Rules → Rulesets) — a newer system with the same options, but more flexible: you can target multiple branches, define a bypass list (e.g. an admin team), and inherit rules from the organisation level.
If a repository has no protection rules, anyone with write access can push directly to main — no PR needed. That is the default for new repositories and the current state of your komiti_library.
4.4) Clone the repository
git clone downloads the entire repository (all branches, all history) from GitHub to your local machine. You only need to do this once per repository.
- Open PowerShell and navigate to
C:\dev:
PS C:\Users\you> cd C:\dev- Clone via HTTPS (recommended for beginners). Replace
YOUR_GITHUB_USERNAMEwith your actual GitHub username (if you already createdkomiti_library, open it in the browser; in a URL, betweenhttps://github.com/and/komiti_library, is where you can see your GitHub username):
PS C:\dev> git clone https://github.com/YOUR_GITHUB_USERNAME/komiti_library.gitGit will create a folder komiti_library containing the full repo. You can verify it exists:
Now enter the folder:
PS C:\dev> cd komiti_libraryAnd list its contents, including hidden items:
PS C:\dev\KomITi\komiti_library> ls -Force

    Directory: C:\dev\KomITi\komiti_library

Mode                 LastWriteTime         Length Name
----                 -------------         ------ ----
d--h-          2026-03-26   12:00                .git
-a---          2026-03-26   12:00            30 README.md
-a---          2026-03-26   12:00            45 x.md
You see README.md and x.md — the files that exist on main. The .git/ folder (marked h for hidden) is where Git stores all history, branches, and configuration — you never edit it directly. The -Force flag tells PowerShell to show hidden items; without it, .git/ would not appear. The file y.md is not visible because git clone checks out the default branch (main), and y.md only exists on staging. You will see it once you switch to staging.
From this point on, every git command you run inside this folder talks to your komiti_library repository on GitHub because origin is already set to that URL.
Now open that komiti_library folder in VS Code (File → Open Folder) so that the editor, Explorer, Source Control panel and terminal all point to the same repo.
What you should notice:
- Windows Explorer: Open
C:\dev\KomITi\komiti_libraryin Windows Explorer. You seeREADME.mdandx.md. If you enable View → Show → Hidden items, you also see the.gitfolder. - VS Code Explorer: After File → Open Folder → komiti_library, the Explorer sidebar shows
README.mdandx.md. No.gitfolder is visible — VS Code hides it by default (controlled by thefiles.excludesetting). - VS Code Source Control: The Source Control panel now recognises the repo and shows 0 changes.
- Git status indicator: Look at the bottom-left corner of the status bar — it displays the current branch name:
main. In the Explorer file tree, none of the files (README.md,x.md) have any coloured letter decorations — they are all clean and tracked.
You are now ready for the step-by-step workflow below.
4.5) Get the latest main
PS C:\dev\KomITi\komiti_library> git checkout main
PS C:\dev\KomITi\komiti_library> git pull origin main
git checkout main: switches to the local branchmain.git pull origin main: pulls the latest changes from the remoteoriginfor the branchmainand merges them into the localmain.origin: argument that specifies which remote you are pulling from.main: argument that specifies which branch you are pulling.
Here you are taking the latest main branch as a starting base. In the cabinet analogy: you opened the main binder (branch) and checked whether you have its latest files from the remote cabinet (repo).
git clone, your local main is already in sync with origin/main — git pull reports Already up to date. and nothing on disk changes. That is normal, not a failure. The habit of running git pull origin main before every new feature branch is what matters; on later iterations, when teammates have pushed, the pull will actually bring new commits.What you should notice:
- Windows Explorer: No change — your local
mainwas already in sync withorigin/main, so no files were added or removed.
Advanced content: deep dive into.git/— if you open the hidden.gitfolder, you can see traces of whatgit pullactually did:.git/FETCH_HEAD— contains the commit hash Git just fetched from GitHub. Overwritten every time you rungit pullorgit fetch..git/refs/remotes/origin/main— stores the commit hash your local Git considers the tip oforigin/main. After a successful pull it matchesFETCH_HEAD..git/HEAD— containsref: refs/heads/main— this is how Git knows which branch you are on. Changes when you switch branches.
- VS Code Explorer: No change — the file tree stays the same:
README.mdandx.md. No coloured letter decorations on any file — everything is clean and tracked. - VS Code Source Control: The panel stays clean — 0 changes. If the pull brought new code, VS Code would automatically refresh the Explorer file tree with the updated files.
- Git status indicator: The status bar still shows
main. No sync arrows appear — your localmainis in sync withorigin/main.
4.6) Create a new feature branch from main
This section walks through creating a feature branch end-to-end. The first three sub-sections (4.6.1–4.6.3) use the plain git checkout -b flow on your training repo komiti_library. The last two (4.6.4–4.6.5) introduce the KomITi team convention that replaces git checkout -b on the real repositories.
4.6.1) Create the local branch
First, confirm you are on main:
PS C:\dev\KomITi\komiti_library> git branch
* main
git branch lists all local branches; the asterisk (*) marks the one you are currently on. You should see * main. Notice that staging does not appear — git branch only shows branches that exist locally. The staging branch lives on GitHub (origin/staging), but you have never checked it out on your machine, so Git has no local copy of it yet.
PS C:\dev\KomITi\komiti_library> git checkout -b 2026-03-23-play_xyzYou created a new branch from the current position and immediately switched to it.
-bmeans: create a new branch and immediately switch to it; it is a short option, i.e. a flag, and is an abbreviation ofbranch.2026-03-23-play_xyzis an argument; with it you specify what the new branch will be named.
4.6.2) Publish the branch to GitHub
If you want the branch to exist on GitHub right away:
PS C:\dev\KomITi\komiti_library> git push -u origin 2026-03-23-play_xyzYou sent the new branch to GitHub and remembered the upstream link.
-umeans--set-upstream; it is an option that tells Git to remember the link between the local branch and the remote branch of the same name.originis an argument and means: to which remote you are sending.2026-03-23-play_xyzis an argument and means: which branch you are sending.
4.6.3) Bring in staging content (demo shortcut)
But wait — your feature branch was created from main, which only has x.md. You also want the content from staging (which has y.md). The straightforward way is to merge origin/staging into your feature branch:
PS C:\dev\KomITi\komiti_library> git merge origin/stagingThis is a teaching shortcut for the tutorial: in real KomITi workflow you start a feature from main and the feature is what later gets promoted into staging — not the other way around. Here we merge origin/staging just so the next steps (branch switching demo, promotion) have visible files to move around. An equivalent alternative is to create the feature directly from origin/staging: git checkout -b 2026-03-23-play_xyz origin/staging.
Tip: if a terminal text editor (Vim) opens asking you to confirm the merge commit message, type :wq and press Enter to save and exit. If you see -- INSERT -- at the bottom, press Esc first, then :wq.
To skip the editor entirely, add --no-edit:
PS C:\dev\KomITi\komiti_library> git merge origin/staging --no-editNow your feature branch has README.md, x.md and y.md — the same as staging.
4.6.4) KomITi team convention — Worktree-per-Branch (WTPB)
Important: this sub-section applies on the real KomITi repositories (odoo4komiti and komiti_academy) only. On your training repo komiti_library the plain git checkout -b flow from 4.6.1 is still the correct way.
On real KomITi repositories, git checkout -b in the protected main worktree is not how a feature branch is started. Instead, each feature branch is checked out in a separate folder on disk, side by side with main. The folder name equals the branch name exactly:
Why we work this way — two concrete benefits:
- The active branch is unambiguous from Windows Explorer alone. You never have to run
git branch --show-currentto know what you are editing — the folder name is the branch name. - Multiple agents or developers can work in parallel without disturbing each other. The protected
main\worktree is the one used to promote, deploy, and run production-shaped checks; it must always sit cleanly onmain. Side-by-side feature folders mean nobody has togit checkoutinmain\to look at someone else’s work.
Concrete scenario. Sara is fixing a login CSS bug; Marko is adding an invoicing report. Both branches exist as folders side by side (see diagram above):
- Sara edits files in
C:\dev\KomITi\odoo4komiti\2026-05-14-Sara-fix_login_css\. - Marko edits files in
C:\dev\KomITi\odoo4komiti\2026-05-15-Marko-add_invoicing\. - Sara wants to peek at Marko’s report code — she just opens his folder in a second VS Code window (or adds it as a second root to her workspace). No
git stash, nogit checkout, her own uncommitted edits stay exactly where they are. - Meanwhile
C:\dev\KomITi\odoo4komiti\main\remains untouched onmain— ready at any moment for promotion, deploy verification, or a clean reference build.
Without WTPB this is impossible: a single folder can only have one branch checked out at a time, so peeking at a teammate’s work means saving your own changes somewhere and switching branches — with all the risk of mixing edits.
Naming rule. Feature branches use YYYY-MM-DD-<agent-or-developer>-feature_name — today’s date, then the agent slug or developer name, then a short underscore-separated feature label. For example: 2026-05-17-Academy-02_git_vscode_basics_revision.
Create the worktree from the current origin/main:
PS C:\dev\KomITi\odoo4komiti\main> git fetch origin
PS C:\dev\KomITi\odoo4komiti\main> git worktree add -b 2026-05-14-Sara-fix_login_css C:\dev\KomITi\odoo4komiti\2026-05-14-Sara-fix_login_css origin/main
List active worktrees and confirm which folder shows which branch:
PS C:\dev\KomITi\odoo4komiti\main> git worktree listRemove the worktree after the feature branch is merged into main, so it does not linger in Windows Explorer:
PS C:\dev\KomITi\odoo4komiti\main> git worktree remove --force C:\dev\KomITi\odoo4komiti\2026-05-14-Sara-fix_login_cssThe same convention applies to komiti_academy: the protected worktree is C:\dev\KomITi\komiti_academy\main, and feature worktrees live under C:\dev\KomITi\komiti_academy\<branch-name>. The full rule is recorded in .github/copilot-instructions.md in each repository (section Working tree convention).
How to open the worktrees in VS Code. Each folder becomes one root folder in the same VS Code window (a multi-root workspace, see section 2.5):
- Open the protected worktree first:
File → Open Folder…and pickC:\dev\KomITi\odoo4komiti\main. This is your baseline window. - For each active feature branch, run
File → Add Folder to Workspace…and pick its worktree folder. VS Code will offer to save the result as a.code-workspacefile — accept it, so the layout survives a restart. - The Explorer panel now shows one collapsible root per worktree. Clicking files under
main\activates themainrepo context; clicking files under a feature root activates that branch’s context — nogit checkoutis ever needed to switch.
What you should notice in VS Code with multiple worktrees open:
- Windows Explorer: one folder per active branch under
C:\dev\KomITi\odoo4komiti\; the folder name equals the Git branch name exactly. - VS Code Explorer: one top-level root per folder; the root header shows the folder name, which (by WTPB convention) is also the branch name.
- VS Code Source Control: one entry per root, each with its own staged and unstaged list. You stage and commit in the entry that matches the worktree you edited — no risk of mixing changes from two branches in one commit.
- Git status indicator (Status Bar): displays the branch of the currently active file’s root. Click a file in
main\→ Status Bar showsmain; click a file in a feature root → it switches to that branch. Fastest way to confirm which branch your next commit will land on.
When a feature is merged and you run git worktree remove …, also remove the folder from VS Code: right-click the root in Explorer → Remove Folder from Workspace. Otherwise VS Code will keep showing a phantom root pointing at a deleted folder.
What you should notice (overall, across 4.6.1–4.6.5):
- Windows Explorer: After
git checkout -b, no change — the new branch contains the same files asmain. Aftergit merge origin/staging,y.mdappears in the folder.
Advanced content: deep dive into.git/— if you open the hidden.gitfolder, you can see what changed behind the scenes:.git/HEAD— aftergit checkout -b 2026-03-23-play_xyz, this file changes fromref: refs/heads/maintoref: refs/heads/2026-03-23-play_xyz. That is how Git knows you switched to the new branch..git/refs/heads/2026-03-23-play_xyz— this new file appears when the branch is created. At first it points to the same commit asmain; after the merge it moves forward to the new merge commit..git/ORIG_HEAD— aftergit merge origin/staging, Git stores the commit you were on before the merge. This is useful if you need to inspect or undo the merge.
- VS Code Explorer: Same behaviour —
y.mdappears in the sidebar immediately after the merge. VS Code refreshes the file tree automatically. - VS Code Source Control: The Source Control panel still shows 0 changes because the merge was clean and already committed. You can also click on the branch name in the status bar to see and switch between branches — this is the VS Code equivalent of
git checkout. After thegit merge origin/staging, VS Code Explorer instantly showsy.mdappearing in the file tree. - Git status indicator: The status bar branch name switches from
mainto2026-03-23-play_xyz. If you rangit push -u, a sync icon with 0↑ 0↓ appears, meaning local and remote are in sync. No coloured file decorations — all files are cleanly committed.
4.7) Make local changes
Now create a new file z.md that will exist only on your feature branch. Open VS Code, create the file, or do it straight from the terminal:
PS C:\dev\KomITi\komiti_library> Set-Content -Path z.md -Value "This file exists only on the feature branch."Set-Content is a PowerShell cmdlet (not a Git command) that writes text to a file, creating it if it does not exist. It defaults to UTF-8 on PowerShell 7+; on Windows PowerShell 5 it writes ANSI — use -Encoding utf8 if you need an explicit encoding. Avoid the legacy echo "..." > z.md redirection in PowerShell: it writes UTF-16 LE with a BOM, which Git will store but other tools may not expect.
Then check the state:
PS C:\dev\KomITi\komiti_library> git status --short
PS C:\dev\KomITi\komiti_library> git diff --stat
git status --short: shows a short, compact status of the working tree. You should see?? z.md— a new untracked file.git diff --stat: shows a statistical overview of changes per file.--shortand--statare long options that request a compact display.
What you should notice:
- Windows Explorer:
z.mdappears in the folder as a new file, just like any regular file you create.
Advanced content: deep dive into.git/— even thoughz.mdnow exists in the folder, Git has not stored it internally yet:.git/index— this file does not includez.mdyet, because you have not rungit add. That is why Git still treats it as untracked..git/objects/— no blob object forz.mdexists yet. Git only writes the file snapshot into its object database after you stage or commit it..git/HEAD— still points toref: refs/heads/2026-03-23-play_xyz. Creating a new file in the working folder does not move the branch or create a commit by itself.
- VS Code Explorer:
z.mdappears in the sidebar with a green U decoration to the right of the file name — Git marks it as Untracked. - VS Code Source Control: Open the Source Control panel in the sidebar (Ctrl+Shift+G). You will see
z.mdlisted under Changes with a green U badge — U stands for Untracked (Git has never seen this file before). The Source Control icon in the Activity Bar also shows a badge with the number 1, telling you there is one pending change. - Git status indicator: If you run
git status --short, you see?? z.md— Git's terminal-style way of saying the file is untracked. In the VS Code status bar, the current branch still remains2026-03-23-play_xyz.
4.8) Stage and commit
PS C:\dev\KomITi\komiti_library> git add z.md
PS C:\dev\KomITi\komiti_library> git commit -m "Add z.md to feature branch"
git add z.md: stages only that one file. When we saystaged, it practically means: you chose for that change to enter the next snapshot, i.e. into the next commit.git add --all: stages all detected changes in the working tree, including new, modified and deleted files. The--allflag tells Git you are not picking individual files but all current changes.
git commit -m "Add z.md to feature branch": creates a commit from staged changes and immediately writes the commit message.
-m: short option formessage."Add z.md to feature branch": argument of the-moption, i.e. the commit message text.
The short commit ID (e.g. 66bee36) is the abbreviated commit hash that Git prints after a successful commit. That number and letters are not random: it is a short version of the unique identifier of that commit. The full commit hash is much longer, and Git in everyday work often shows only the abbreviated version, sufficient to clearly identify the commit in that repo. Practically, 66bee36 means: "this exact code snapshot". That's why you can say, for example: look at commit 66bee36 or this change entered 66bee36.
This means you locally saved the new state of your feature branch.
This is the part where most beginners first truly see the difference between save, add and commit — revisit section 3 if you need a refresher.
What you should notice:
- Windows Explorer: No change — staging and committing are Git-internal operations; no files are created, renamed, or deleted on disk.
Advanced content: deep dive into.git/— if you open the hidden.gitfolder, you can inspect what changed internally:.git/index— this is Git's staging area. Aftergit add z.md, the file's metadata and content snapshot are recorded here, which is why Git now treatsz.mdas staged..git/HEAD— aftergit commit, this still points to your current branch, but that branch now points to a new commit. In other words,HEADstays on the same branch name while the branch tip moves forward..git/objects/— aftergit commit, Git writes new internal objects here: the file snapshot (blob), the directory snapshot (tree), and the commit object itself.
- VS Code Explorer: The files in the folder stay the same, but the decorations change: after
git add,z.mdswitches from green U to green A (Added); aftergit commit, all decorations disappear — every file is clean. - VS Code Source Control: After
git add z.md,z.mdmoves from Changes to Staged Changes. Aftergit commit, the panel clears completely — 0 pending changes. You can also do this visually: click the + next to a file to stage it, type a commit message in the text box at the top, and click the ✓ Commit button. - Git status indicator: If you run
git status --shortaftergit add,z.mdchanges from?? z.mdtoA z.md— Git now treats it as staged for the next commit. Aftergit commit, the working tree becomes clean again, and the VS Code status bar shows ↑1 — one commit ahead of the remote, waiting to be pushed.
4.9) Push to GitHub
PS C:\dev\KomITi\komiti_library> git push origin 2026-03-23-play_xyzgit push origin 2026-03-23-play_xyz sends local commits from that branch to GitHub (the origin and branch arguments work the same as in 4.5).
Now the latest commit from your local feature branch also exists on GitHub, so the remote branch contains z.md too.
This is an important distinction:
- local
2026-03-23-play_xyz= on your machine, - remote
origin/2026-03-23-play_xyz= on GitHub, - in the cabinet analogy: you sent your working binder (branch) to the remote cabinet (repo) so that others can see that version too.
What you should notice:
- Windows Explorer: No change — pushing sends commits to GitHub; nothing changes on your local disk.
- VS Code Explorer: No change in the file tree. The push only affects the remote — you can verify on GitHub that the latest commit, including
z.md, is now visible on the remote branch there. - VS Code Source Control: The Source Control panel still shows 0 changes (nothing has changed locally). You can also push by clicking the ⋯ menu in the Source Control panel and selecting Push.
- Git status indicator: Before the push, the status bar shows ↑1 next to the branch name — your local branch is 1 commit ahead of the remote. After
git push, the ↑1 disappears and the sync indicator shows 0↑ 0↓: your local branch and the remote branch are now fully in sync.
4.10) See it with your own eyes — branch switching demo
Now comes the most tangible moment: you will switch between branches and watch files appear and disappear in both Windows Explorer and VS Code Explorer. Open a Windows Explorer window to C:\dev\KomITi\komiti_library and keep it visible side-by-side with your terminal.
PS C:\dev\KomITi\komiti_library> git checkout main
PS C:\dev\KomITi\komiti_library> ls
You should see only README.md and x.md. Look at Windows Explorer — y.md and z.md are gone.
PS C:\dev\KomITi\komiti_library> git checkout staging
PS C:\dev\KomITi\komiti_library> ls
Now you see README.md, x.md and y.md. In Windows Explorer, y.md appeared but z.md is still gone.
PS C:\dev\KomITi\komiti_library> git checkout 2026-03-23-play_xyz
PS C:\dev\KomITi\komiti_library> ls
All three: x.md, y.md and z.md are back. This is exactly the behaviour explained in section 1.2 — Git physically overwrites, creates and deletes files on disk when you switch branches. You just proved it to yourself.
What you should notice:
- Windows Explorer: files
y.mdandz.mdphysically disappear when you switch tomain,y.mdreappears onstaging, and all three are back on the feature branch. Git creates and deletes real files on disk — the previous contents are not lost, they live compressed in.git/objects/. - VS Code Explorer: the file tree refreshes automatically after each
git checkout. No coloured decorations appear — every checkout lands you on a clean tree. - VS Code Source Control: the panel stays at 0 changes on every branch — you are only switching, not editing.
- Git status indicator: the branch name in the status bar changes with each
git checkout:main, thenstaging, then2026-03-23-play_xyz. The sync indicator follows whichever remote tracking each branch is set to.
4.11) Promotion to staging
PS C:\dev\KomITi\komiti_library> git checkout staging
PS C:\dev\KomITi\komiti_library> git pull origin staging
PS C:\dev\KomITi\komiti_library> git merge 2026-03-23-play_xyz
PS C:\dev\KomITi\komiti_library> git push origin staging
The steps with Cabinet analogy:
- stand on the receiving branch (open the verification binder)
- pull the latest from GitHub for that branch (check that the binder is fresh)
- merge the feature content in (copy the files from your working binder into it)
- push to the remote GitHub branch (send the updated binder back to the remote cabinet)
git merge 2026-03-23-play_xyz, Git may open a text editor and show a default merge commit message such as Merge branch '2026-03-23-play_xyz' into staging. This is normal: Git is asking you to confirm the commit message for the new merge commit. In most cases you can keep the default message. See the vim exit tip in section 4.6.3.
What you should notice:
- Windows Explorer: after
git checkout staging,z.mddisappears (it lives only on the feature branch). Aftergit merge 2026-03-23-play_xyz,z.mdreappears —stagingnow contains the same files as the feature branch. - VS Code Explorer: the file tree refreshes to match the checked-out branch. After the merge,
z.mdshows up in the tree without any decoration — it is committed by the merge commit itself. - VS Code Source Control: after the merge the panel returns to 0 changes (Git committed the merge for you). Before
git push, the panel shows ↑1 in the branch indicator — one local commit ahead oforigin/staging. After the push it returns to 0↑ 0↓. - Git status indicator: the branch name in the status bar reads
staging.git log --oneline -n 3now shows the new merge commit at the top.
4.12) Promotion to main
When the change is verified on staging, you go to main:
PS C:\dev\KomITi\komiti_library> git checkout main
PS C:\dev\KomITi\komiti_library> git pull origin main
PS C:\dev\KomITi\komiti_library> git merge staging
PS C:\dev\KomITi\komiti_library> git push origin main
Same pattern as 4.11. Note: in this workflow you merge staging into main, not the feature branch directly — the verified content comes from the intermediate branch. In the cabinet analogy: you open the main binder (branch) and copy into it the files that have already passed verification.
What you should notice:
- Windows Explorer: after
git checkout main,y.mdandz.mddisappear (onlyx.mdexisted onmainbefore). Aftergit merge staging, both reappear —mainnow matchesstaging. - VS Code Explorer: the file tree refreshes to the new state of
mainafter each command. No coloured decorations — the merge commits the files for you. - VS Code Source Control: after the merge the panel shows 0 changes with ↑1 pending push. After
git push origin main, the indicator clears. - Git status indicator: the branch name reads
main. On a real KomITi repo,mainis usually protected — the direct merge shown here works only because your ownkomiti_libraryhas no branch protection rules yet.
4.13) Return to your feature branch if you continue working
PS C:\dev\KomITi\komiti_library> git checkout 2026-03-23-play_xyzgit checkout 2026-03-23-play_xyz: returns you to the local feature branch to continue working.
If you understand this, then you practically also understand:
- in the cabinet analogy: you returned to your working binder (branch) and continue writing on its files, not on the
stagingormainbinder (branch), - what a local branch is,
- what a remote branch is,
- what
checkoutis, - what
pullis, - what
pushis, - what promotion between branches is.
What you should notice:
- Windows Explorer:
z.mdreappears on disk because the feature branch still contains it. The other files (x.md,y.md) are present too — they were merged in earlier. - VS Code Explorer: the file tree refreshes to the feature-branch state. No coloured decorations — you have no uncommitted local changes yet.
- VS Code Source Control: the panel shows 0 changes. Ready for new work.
- Git status indicator: the branch name in the status bar switches from
mainback to2026-03-23-play_xyz. The sync indicator shows 0↑ 0↓ — local and remote are in sync because nothing new has been committed since the last push.
4.14) Clean up: delete the branch and prune stale references
Once your feature branch has been promoted all the way to main, it has served its purpose. Keeping it around only clutters the branch list. Good practice is to delete it — both locally and on GitHub.
Delete the local branch
PS C:\dev\KomITi\komiti_library> git checkout main
PS C:\dev\KomITi\komiti_library> git branch -d 2026-03-23-play_xyz
You switched to main first because Git does not allow you to delete the branch you are currently on. Then git branch -d deletes the local branch — but only if it has already been fully merged. If the branch contains unmerged work, Git refuses and warns you.
If you are absolutely sure you want to discard unmerged work, use the uppercase flag:
PS C:\dev\KomITi\komiti_library> git branch -D 2026-03-23-play_xyz-D is a force-delete — it removes the local branch regardless of merge status. Use it with caution.
Delete the remote branch on GitHub
PS C:\dev\KomITi\komiti_library> git push origin --delete 2026-03-23-play_xyzThis tells GitHub to remove the branch from the remote repository. After this, the branch no longer appears on GitHub.
Prune stale remote-tracking references
PS C:\dev\KomITi\komiti_library> git fetch --pruneWhen someone else (or you, from another machine) deletes a remote branch, your local Git still remembers it as origin/branch-name. Over time these stale references accumulate. git fetch --prune contacts the remote, compares the list, and removes any local remote-tracking references that no longer exist on GitHub.
You can verify everything is clean:
PS C:\dev\KomITi\komiti_library> git branch -aThe -a flag shows all branches — both local and remote-tracking. After deleting and pruning, 2026-03-23-play_xyz should no longer appear anywhere in this list.
In the cabinet analogy: you finished with the working binder (feature branch), the files have been copied to the verification binder (staging) and the main binder (main), so you throw away the empty working binder — both from your desk (local) and from the remote cabinet (GitHub). Pruning is checking the cabinet list and crossing off binders that no longer physically exist.
What you should notice:
- Windows Explorer: no change —
z.mdstays in the folder becausemainreceived it via the merge in 4.12. Deleting a branch does not delete the files that branch introduced once they have been merged intomain. - VS Code Explorer: no change in the file tree. The branch selector at the bottom no longer lists
2026-03-23-play_xyzafter the deletion. - VS Code Source Control: the panel still shows 0 changes. The Branches list in the Source Control overflow menu (⋯ → Checkout to…) no longer offers the deleted branch.
- Git status indicator:
git branch -alists onlymain,stagingand theirorigin/counterparts. The feature branch is gone from both local and remote-tracking lists.
5) Most common beginner mistakes
- confusing
saveandcommit, - committing everything without reading the diff,
- including unrelated files in the same commit,
- working directly on the wrong branch,
- seeing
Uand not understanding it is a new untracked file, - thinking that
pushis the same asdeploy.
6) What to read next
99) Task on the komiti_academy project for the candidate
You already have the komiti_library repo with main, staging and a feature branch from section 4. Now repeat the same workflow independently — this time with three new files whose names hint at which branch introduced them: m.md, s.md and f.md.
- Seed
mainwithm.md— on GitHub (web), switch to themainbranch, createm.mdwith one lineThis file was seeded on main.and commit directly tomain.
Reference: same as 4.3 where you createdx.md. - Seed
stagingwiths.md— on GitHub (web), switch tostaging, creates.mdwith one lineThis file was seeded on staging.and commit directly tostaging.
Reference: same as 4.3 where you createdy.mdonstaging. - Get the latest
main— locally,git checkout mainandgit pull origin main. Confirmm.mdis now on disk.
Reference: 4.5. - Create a new feature branch — pick a name that follows the team branch naming convention (for example
2026-03-24-play_msf: date + short topic). Push it with-u, then mergeorigin/stagingso you also gets.md.
Reference: 4.6. - Create
f.mdon the feature branch — add one lineThis file exists only on the feature branch., then stage, commit and push.
Reference: 4.7, 4.8 and 4.9. - Branch switching demo — switch between
main,stagingand your feature branch, runninglsafter each checkout. Verify thatm.mdappears on all three,s.mdappears onstagingand the feature branch only, andf.mdappears only on the feature branch.
Reference: 4.10. - Promote — merge your feature branch into
staging, thenstagingintomain, pushing after each merge.
Reference: 4.11 and 4.12. - Return to your feature branch — confirm you are back on it and ready for the next piece of work.
Reference: 4.13. - Clean up — delete your feature branch locally (
git branch -d) and on GitHub (git push origin --delete), then rungit fetch --pruneand confirm withgit branch -athat the feature branch is gone from both local and remote-tracking lists.
Reference: 4.14. - Remove practice files — you no longer need the
.mdfiles created during the tutorial. Onmain, delete all of them, commit, and push:
Then propagate the deletion toPS C:\dev\KomITi\komiti_library> git checkout main PS C:\dev\KomITi\komiti_library> git rm x.md y.md z.md m.md s.md f.md PS C:\dev\KomITi\komiti_library> git commit -m "clean up: remove tutorial practice files" PS C:\dev\KomITi\komiti_library> git push origin mainstaging:
After this, onlyPS C:\dev\KomITi\komiti_library> git checkout staging PS C:\dev\KomITi\komiti_library> git pull origin staging PS C:\dev\KomITi\komiti_library> git merge main PS C:\dev\KomITi\komiti_library> git push origin stagingREADME.mdshould remain on both branches. Verify withls.
When you are done, both branches should contain only README.md, the feature branch should no longer exist, and the repo is clean and ready for real work.
Self-check
Before you consider this tutorial complete, make sure you can explain these key concepts and answer the questions below.
Key concepts — explain in your own words:
working tree,staged changes,commit,branch,checkout,merge,fork,clone,origin,push,pull.
You must be able to answer:
- what
Mmeans and whatUmeans in VS Code, - what the difference is between save / commit / push,
- what the difference is between
GitandGitHub, - what the difference is between
forkandclone, - what a branch is,
- what
checkoutdoes and whatmergedoes, - what the difference is between local
stagingand remoteorigin/staging, - why we check
git status --shortbefore a commit, - why we do not put unrelated files in the same commit,
- what the difference is between
DevOpsandCI/CD, - how to delete a local branch and a remote branch,
- what branch pruning is and when you need it.